Pages

Friday, 31 July 2015

Asian style Garlic Broccoli...good girl!!

Asian style Garlic BroccoliB, this one is for you - proof that I do eat my greensthis is my lunch or 4 p.m. snack at least once a weekwell, this or broccoli drizzled with a little butter and lemon juiceI eat my greens, I am a good girl J (and no the last bit is not up for discussion!!)


Chinese Garlic Broccoli  mmskitchenbites


Asian style Garlic Broccoli


Ingredients:

  • Purple Sprouting Broccoli OR Tenderstem Broccoli/Broccolini OR Broccoli Rabe OR Chinese Broccoli/Gai-lan OR Regular Broccoli, 200 gms (I used purple sprouting this time)
  • Garlic, Thinly sliced or finely chopped/minced, 2-4 (I like sliced garlic here, but chopped/minced goes well too as it gets into the florets)
  • Red chilli flakes or sliced fresh chillies, ¼ tsp or 1-2
  • Dark Soy Sauce, 1tbsp
  • Rice Vinegar, 2tsp
  • Sugar, ½ tsp
  • Sesame Oil, ½ tsp (optional)
  • Oil, 1tbsp
  • Salt, to taste, if required


Instructions:

Trim off any hard ends from the stalks as well as any very coarse leaves. Rinse the broccoli under cold water.

Cook the broccoli till tender but still crisp – al dente is the key! Time will depend of the kind of broccoli you are using so keep on eye on it. 

You can either:
  • Steam: Put the broccoli in a steamer basket or a colander over a pan of simmering water. Season lightly with salt and then cover and steam for 4-8 minutes.
  • Sauté/Stir fry: Heat a wok with a tsp of oil. Add the broccoli and fry for 2-3 minutes tossing around to cook evenly.
  • Microwave: Cover lightly and zap for a minute or two.
  • Boil: Put the broccoli in a large pan of salted boiling water. Let the water come to a boil again and simmer for 2-4 minutes. Drain thoroughly.


(The above methods are in the order of my preference. Boiling is my least favourite method of cooking any vegetable and I avoid it like the plague!! )

Mix the dark soy sauce, rice vinegar and sugar in a small bowl.

Heat a large wok on high heat for about a minute.

Swirl in the oil and heat it till it starts to shimmer.

Add in the garlic and chilllies and stir fry until fragrant (if using sliced garlic, wait for it to start turning slightly golden at the edges)

Add in sauce mix and broccoli. Toss around for no more than a minute – just so that stalks are warmed up and sauce is well coated.

Check for salt and drizzle with sesame oil.


Serve immediately!

Wednesday, 29 July 2015

Chicken Noodles with Chili Bean Sauce...finishing up the bottle!!

Chicken Noodles with Chili Bean SauceJuly seems to be an Asian inspired month for the blog (and needless to say for us!)cook a couple of times and then post throughout the month seems to be my new strategyactually come to think of it, I should have just called it an Asian week or monthoh well, next timebut honestly, I needed to finish that bottle of chilli bean sauce in cooked food instead of buying some more crackers to use it as my movie time dip!! J


Chicken Noodles with Chili Bean Sauce


Ingredients:

  • Thin or wide noodles, fresh around 300gms or dried around 180gms
  • Mixed vegetables of your choice, 300gms (I used carrots, mushrooms, onions, cabbage, mung bean sprouts, baby spinach)
  • Chicken breast, thinly sliced, 300gms
  • Garlic, finely chopped, 2-3
  • Ginger, finely grated, 2 tsp
  • Salt, if needed to taste
  • Oil, 1 tbsp + 1 tbsp
  • Sesame oil, to drizzle (optional)


For the Sauce:

  • Chilli beans sauce, 2tbsp
  • Sugar, 2 tsp
  • Dark Soy sauce, 2 tsp
  • Shaoxing rice wine, 2 tsp
  • Chicken stock, ¼ cup


For the marinade:

  • Light Soy sauce, 1 tsp
  • Shaoxing rice wine, 1 tsp
  • Oil, 1 tsp (preferably sesame oil)
  • Corn starch, 1 tbsp
  • Salt, to taste
  • Pepper, to taste


Garnish:

  • Spring/Green onions/Scallions, only the green portion, 2-3


Instructions:

Marinate the chicken with light Soy sauce, Shaoxing rice wine, sesame oil, salt, pepper, to taste in a medium size bowl. Sprinkle with corn starch, toss to coat well and leave to marinade in the refrigerator for about half an hour to overnight. Get the chicken back to room temperature before cooking.

Mix the sauce ingredients in a small bowl and keep aside.

If using dried noodles, boil the noodles in well salted water per instructions given on the packet. Drain well, toss with 1 tbsp oil and keep aside.

Heat a large wok on high heat for about a minute.

Swirl in 1 tbsp oil and heat it till it starts to shimmer. Stir fry the marinated chicken for 3-4 minutes till done. Remove the chicken and keep aside

Add the remaining 1 tbsp oil to the wok. Add in the garlic and ginger and stir fry for about 10 seconds.

Add the onions and carrots and stir fry for another 10 seconds.

Add the mushrooms and stir fry for a minute or two. All vegetables should still retain some crunch.

Add the sauce mix to work and let it come to a quick boil.

Add in the noodles, spinach, cabbage, mung bean sprouts and reserved chicken to the wok. Stir fry for another minute or two till everything is coated well with sauce. Taste and add salt if required.

Drizzle with a tsp or two of sesame oil.
Top with the spring onions. Serve hot.


Notes:

Chilli Bean Paste is also known as “Toban Djan”. I use the Lee Kum Kee brand which is a little more garlicky than a couple of other brands that I have tried. A really good and must have addition for your kitchen if you cook Chinese often. If you don’t, you can try substituting with Sambal Oelek or any other Asian Chilli sauce.


Friday, 24 July 2015

Asian Style Roasted Potatoes...don't wonder, plate up!!

Asian Style Roasted Potatoesever wondered why there are no or rather almost any dishes using potatoes in Chinese food? Except one with shredded/matchstick cut potatoes and I there was NO WAY I was going through all that cutting/dicing trouble today or maybe EVER!! Take the easy routeput up an Asian style/ Asian inspired dish instead!! J


Asian Style Roasted Potatoes


Ingredients:

  • Baby Potatoes, peeled and quartered, 500gms (or regular ones diced into bite size pieces)
  • Red Chilli flakes, ½ tsp
  • Garlic powder, ½ tsp
  • Chinese 5 spice powder, ¼ tsp
  • Dark soy sauce, 1-2 tsp (just enough to lightly coat all the cubed potatoes)
  • Oil, 1 tsp


For the sauce:

  • Scallions/Spring onions, only the white portion, very finely chopped, 2-3
  • Celery, very finely chopped, ½ -1
  • Garlic, thinly sliced, 2-3
  • Light soy sauce, 1 tbsp
  • Honey, 1 tbsp
  • Salt, if needed,
  • Oil, 2 tsp
  • Celery leaves or Scallion/Spring onion greens, a handful


Instructions:

Soak the potatoes in cold salted water for about 15-20 minutes. Drain well and pat dry with a kitchen towel.

Take a medium size bowl and whisk together the garlic powder, Chinese 5 spice powder, red chili flakes, soy sauce and oil. Add the potatoes and toss well. Keep aside for 10-15 minutes.

Preheat the oven to 220C.

Line a baking sheet with foil and spread the potatoes flat on the sheet. Roast in the oven till potatoes are done – about 45 - 60 minutes. Remove and shuffle around the potatoes once after about 20-25 minutes.

Keep everything chopped and ready for the sauce. Start with the sauce the second you switch off the oven.

Heat the oil in a wok or pan at medium heat. Add in the sliced garlic, scallions and celery and cook till they soften.

Add in the light soy sauce, mix well.

Dump in the roasted potatoes and toss around to coat well.

Switch off the heat and drizzle over the honey and celery leaves.

Toss well to ensure all the potatoes are well coated. Check seasoning.

Serve HOT right off the stove!

Wednesday, 22 July 2015

Fried Rice with Celery (stalks and leaves) ...from head to toe!!

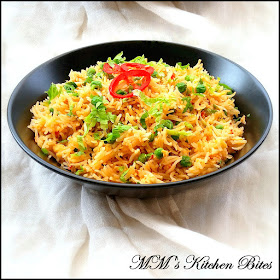
Fried Rice with Celery (stalks and leaves)...when there is enough Celery salt in the kitchen to last us a lifetime and we are not in the mood for soup, this is one of the things where the leaves go...two options, take your pick J


Fried Rice with Celery (stalks and leaves)


Ingredients:

  • Cooked day old rice, 2 cups (if using freshly boiled rice, ensure it is only about 95% done, water is drained out and it has cooled completely)
  • Green peas, 1 cup ( if using frozen,thaw them first; if using fresh, blanch them for a minute or two in hot water) OR Bean Sprouts, 1 cup
  • Garlic, finely chopped or minced, 1-2 cloves
  • Scallions/ Spring Onions/Green Onions, finely chopped, 2-3, only the white portion
  • Celery Stalks, finely chopped, 2-3
  • Celery leaves, chopped, 1 cup
  • Oil, 1 tbsp


Option 1: 

(The one pictured here is this option)
  • Chilli Bean sauce, 1 tbsp for every cup of rice
  • Brown Sugar, ½  tsp for every cup of rice
  • Salt & White Pepper, to taste

 OR

Option 2:

  • Light Soy sauce, ½ tsp for every cup of rice or Regular Soy sauce, ¼ tsp for every cup of rice
  • Brown Sugar, a little less than ¼ tsp for every cup of rice (optional)
  • Salt & White Pepper, to taste


Instructions:


Break up any large clumps of rice before you start cooking.

Heat a large wok on high heat for about a minute.

Swirl in the oil and heat it till it starts to shimmer.

Add in the garlic, scallions and chopped celery stalks and stir fry until fragrant.

Add the peas and quarter cup of celery leaves. Stir fry for a minute or so.

Add the sauce (chilli bean sauce or soy sauce) and sugar. Stir and let it cook for about 5-10 seconds.

Add the rice and the rest of the celery leaves (reserve some aside) and toss everything well together.

Stir and toss to mix until rice is well coated and heated through. Taste and add salt and pepper.


And done!! Top it up with the reserved celery leaves and serve hot!! 


Notes:


  • Chilli Bean Paste is also known as “Toban Djan”. I use the Lee Kum Kee brand which is a little more garlicky than a couple of other brands that I have tried. A really good and must have addition for your kitchen if you cook Chinese often. If you don’t, you can try substituting with Sambal Oelek or any other Asian Chilli sauce.


Friday, 17 July 2015

Stir Fried Chicken in Chilli Bean Sauce...not just chocolate!!

Stir Fried Chicken in Chilli Bean SauceYou know what?!! Some recipes are magical. They just know what your soul needs and hit the spot – whether you are feeling down and out or feeling on top of the world. Abracadabra!! and it is taken care of at the first bite (and all this while you thought only chocolate had that magical power!! tch tch!! J)adapted from one of Jeremy Pang’s recipes, hope you enjoy it as much as we do!


Chilli Bean Sauce Chicken mmskitchenbites


Stir Fried Chicken in Chilli Bean Sauce


Ingredients:

  • Chicken, boneless and skinless, diced into bite sized pieces, either all breast or all thigh pieces, 300gms
  • Garlic cloves, finely chopped, 3-4
  • Onion, cut into wedges and petals separated, 1 medium size
  • Bell Peppers, chopped into large cubes, ½ large yellow pepper and ½ large green pepper
  • Spring Onions/Scallions ,only the green portion, tops finely chopped , middle portion cut into about an inch and a half long pieces, 3-4
  • Cashews, 100-150gms (I had roasted unsalted cashews so I used those. You can either roast the cashews in a preheated oven at 180C for about 5 minutes or toss around with ½ tbsp oil in the wok on low heat till pale golden.)
  • Oil, 1 tbsp + 1 tbsp
  • Pepper powder, to taste
  • Salt, to taste
  • Fresh Chillies, thinly sliced, as few or as many as you want (I used the fat red ones which impart flavor but don’t have any heat)


For the marinade:

  • Chinese 5 spice powder, ¼ tsp
  • Sesame Oil, ¼ tsp
  • Sugar, 1 tsp
  • Light Soy Sauce, 1 tbsp
  • Cornstarch, 1 tbsp


For the sauce:

  • Chilli Bean sauce, 2 tbsp
  • Oyster sauce, 1 tbsp
  • Light Soy Sauce, 1 tbsp
  • Rice Wine Vinegar, 1 tbsp


Garnish:

  • Fresh chillies and spring onions, reserve a few from cooking


Instructions:


Marinate the chicken with sugar, Chinese 5 spice powder, sesame oil, light soy sauce in a medium size bowl. Sprinkle with corn starch, toss to coat well and leave to marinade in the refrigerator for about half an hour to overnight. Get the chicken back to room temperature before cooking.

Mix the sauce ingredients in a small bowl and keep aside.

Heat a large wok on high heat for about a minute.


Swirl in 1 tbsp oil and heat it till the oil starts to shimmer. 

Stir fry the marinated chicken for 3-4 minutes till done. Remove the chicken and keep aside

Add the remaining 1 tbsp oil to the wok. Add in the red chillies and garlic and stir fry for about 10 seconds.
Add the onions and stir fry for another 30 seconds or so.

Add the peppers and the long cut scallions. Stir fry for a couple of minutes. All vegetables should still retain some crunch.

Add the chicken back into the wok with cashews, finely chopped green onions, crushed pepper and the sauce mix. 

Stir fry for another minute or two till everything is coated well with sauce. Taste and adjust seasoning.

Top with the reserved spring onions and chillies. Serve hot.


Notes:


  • Chilli Bean Paste is also known as “Toban Djan”. I use the Lee Kum Kee brand which is a little more garlicky than a couple of other brands that I have tried. A really good and must have addition for your kitchen if you cook Chinese often. If you don’t, you can try substituting with Sambal Oelek or any other Asian Chilli sauce.

  • You can replace sugar with honey. Add honey right at final stage of tossing.


Chicken in Chilli Bean Sauce mmskitchenbites


Saturday, 11 July 2015

Chocolate Fudge Pudding...post number 200,confessions and celebrations!!

“Hi, my name is Mona Malik and I am a food blogger. Welcome to my kitchen” phewwdone!! 

Do I sound like an AA member? Oh, well over the years I have passed up on many good opportunities for the blog simply because of my hesitation to say this. Every time someone would start a conversation saying “Love the blog, would you like to...?” I would run a mile.

I wasn’t shy but hesitant (extremely hesitant) to admit that I blog about food- if you have been part of my journey so far, you know I have never taken this seriouslythe blog isn’t good enough when compared to others, the photographs- meh, no serious photo sessions, no thought process about what to put in next, no scramble to gather props to make it all real pretty, no stories as hook irregular posts etc etc.

I don’ have any friends from the blogging community, I don’t attend blogger’s meets, I don’t search the net looking out for new food trends, my personal facebook has no mention of food anywhere etconly a handful of people from real life know about the blog and a limited few from the virtual world know about the person behind the blog.

But somehow when you are staring at the published posts and about to publish post number 200 - it hits you and you have to say “Hi, My name is Mona Malik and I am a food blogger. Welcome to my kitchen...

First step – check!
Second step – oh well, I am yet to figure that one out (don’t you roll your eyes at me, some things and some people take time to change!!) But seriously more changes coming around but I am yet to finalise themI do know that that some of the things that I listed above as things that I don’t do, will be changing…for now I am enjoying the fact that the “About me” section on the blog finally has my name on it J 

Time to talk numbers:
  • 200th post,
  • 400,000 plus blog views
  • 2,000 plus Facebook likes


Hmmmscratch the note abovesecond step – is to say Thank You for visiting (and revisiting), for that “like”, for the constant encouragement. Eternally grateful!! J

Before I forget, just started Instagram – food is a small part of that handle. You will see food and a get a peek into our life. I have just started on it and still playing around to figure out how it works. So in case you are interested and want to connect:  instagram.com/monamalikmm/.  No weirdoes please!! J


Onwards Ahoy!!... to the recipeso the 200th post had to be a dessert, right? And since it’s me it had to be easy and it had to have something to do with chocolate...here it goes...Chocolate Fudge Pudding a.k.a Self-saucing Chocolate Fudge Pudding 

The recipe has been adapted from the book “The National Trust Complete Traditional Recipe book” by Sarah Edington...enjoy J 


Chocolate Fudge Pudding


Ingredients:

Butter, to grease the pan

** Remember, all ingredients at room temperature

For the Pudding:

  • Butter, 110gms
  • Castor Sugar, 110gms
  • Eggs, 2
  • Self raising flour, 175gms (You can use Regular All purpose flour/ Maida instead, just add 2 tsp baking powder to it)
  • Cocoa powder, Regular Unsweetened or Dutch Processed, 15gms
  • Milk, whole/skimmed, 80ml
  • Salt, ½ tsp (Self raising flour in the U.K unlike the U.S doesn’t have salt added to it.  Skip the salt here, if you are using US self raising flour or if using salted butter)


 For the Chocolate Sauce:

  • Water, 350ml
  • Brown Sugar, 80gms
  • Cocoa powder, Regular Unsweetened or Dutch Processed, 20gms
  • Instant Coffee powder, 10gms
  • Vanilla extract, 5ml


Instructions:


Preheat the oven to 180C.

Butter an ovenproof dish about 8 X 9 inch wide and 4 inch deep.

Sift together flour, salt (if using) and cocoa.

In a large bowl, cream the butter and sugar together until pale and fluffy.

Add in the eggs one at a time with one spoon of the flour with each egg.

Fold in the rest of the Flour mix along with milk.

Scrape the batter into the prepared pan and smooth the top.

In the meanwhile, in a small saucepan, gently heat the water, brown sugar, cocoa and instant coffee powder till the sugar is completely dissolved and the sauce starts to boil. Remove from heat and add vanilla essence.

Pour the sauce over the pudding mixture. The sauce will complete submerge the pudding base underneath.

Bake for 45-50 minutes, until the top is crisp and brown. The pudding would have risen through the sauce, resulting in a moist base with a crisp top.

Serve warm and for extra indulgence, serve with ice cream, double cream or crème fraîche.

Leftovers, if any, can last for a couple of days in the refrigerator (Hah, as if!!J)

Reheat before serving (though we have gorged on it straight out the refrigerator as well in the past)

Don't over bake the pudding as the top then goes very dry. If that happens, just serve each slice upside down and drizzled with pudding sauce and extra cream.


Serves 6 ( or not!! - you would know if you have seen this facebook post)